Original Title "Selective Expandable posts" by : http://hackosphere.blogspot.com/
Earlier, I had announced Peekaboo posts which shows post summaries in main page and expands them in the main page itself. But, some people would still like to use the classic way of expanding posts which takes the reader to the post page upon clicking "Read more" link. One of them asked me how to display the "read more" link only for some long posts and not others. I gave him a combination of peekaboo and non-peekaboo code that serves this purpose. As I started getting more such requests, I thought I will post the code for everyone who wants to use. Here's what you need to do.
1. Find the </head>
tag in your template and add all the code from this page before it.
2. Find this div for the post-body and add the portion of code in red color.
   <div class='post-body'  expr:id='"post-" + data:post.id' >

     <b:if cond='data:blog.pageType == "item"'>
        <style>#fullpost{display:inline;}</style>
        <p><data:post.body/></p>
     <b:else/>
        <style>#fullpost{display:none;}</style>

        <p><data:post.body/></p>

       <span id='showlink'>
        <a expr:href='data:post.url'>Read More......</a>
       </span>
       <script type='text/javascript'>
         checkFull("post-" + "<data:post.id/>");
       </script>
     </b:if>

     <div style='clear: both;'/> <!-- clear for photos floats -->
   </div>
3. Goto Settings->Formatting and at the bottom, you will find the text box provided to specify the "Post template". Copy/paste these lines into that text box and save the settings. (Please DON'T type these lines yourself because you might introduce some spaces that will break the functionality)
Type your summary here
<span id="fullpost">
Type rest of the post here
</span>
If you create a new post now, it shows you clearly where to type the summary and where to add the rest of the post. Please note that you could also divide some or all of your old posts into summary and full post by editing them. The "Read more" link will appear only for the posts that have been divided like this.
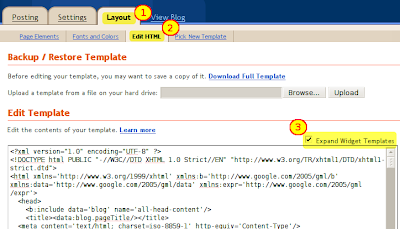
Note 1: If you are not able to find the lines to change, you may not have expanded the template. Select the checkbox named "Expand Widget Templates", which is right above the template code, to expand it into more code.
Note 2: If you click "Older posts" link, the "Read more" link may appear even for the posts which you haven't divided into summary and full post. This is a known problem which we haven't solved yet.
I hope you will link to Hackosphere in your sidebar. That's the only thing I expect in return ;)
How to make "read more" link on Blogger Ad Theme Template
Posted by firman.arrow | 00:59 | blog, Blogging, blogspot hack, Read More | 0 comments »How to Change your Blogger Blog Theme or Blogspot Template
Posted by firman.arrow | 10:01 | Blogging, how to, template | 1 comments »from : http://www.sacada2.com/
-------------------------------------------------------------------------------------------------
My Notes :
This is my first step after I made blog on blogger
-------------------------------------------------------------------------------------------------
Changing your Blogger Theme or Blogspot Theme is easy and simple. I decided to make a step by step tutorial on How to change the Blogger Blog Theme just for the Newbie Blogger out there. Hope this will help.
Download the theme that you want for your Blog. In this example I chose the Simple Blogger Theme. I love this Blogspot theme and I used it to several of my Blogspot Blogs. Most of the time I look for Blogger Themes at Eblog Templates, There’s a lot of beautiful Blogger Blog themes in this website.
Changing Blogger Blog theme is really easy is simple, it’s only hard when you don’t know it yet. I wish I have made this tutorial” How to change a Blogger Blog Template” or Theme sound and clear.
Read More......
How to create expandable post summaries in WP Premium Blogger Template
Posted by firman.arrow | 08:36 | blog, blogspot hack, how to | 0 comments »From : http://coderstalk.blogspot.com/
-------------------------------------------------------------------------------------------------
My Notes :
-------------------------------------------------------------------------------------------------
My Notes :
I've been walking around the internet to find a solution for adding a " read
more" link on a blogger post with wp premium template, and finally I found this
great tutorial from http://coderstalk.blogspot.com/ then I
posted it here to make me remember for this, and hope it helps others...
-------------------------------------------------------------------------------------------------
 I've been tweaking my blog template because I've already bored with my old default template that I use previously. While working on this template, I'm thinking that it may be cool to have my long post to be truncated and have the "read more" link.
I found the code from Blogger Help to do this. However, there is one issue with their code where the "read more" link will appear regardless of whether a post has been truncated or not.
You can check it out at
help.blogger.com on How can I create expandable post summaries?. If you have already read them, you should notice the disadvantages under the Note list which says:
- Disadvantages: Requires changes to the posts themselves, rather than to the template only. However, the "read more" link is in the template, so it will appear regardless of whether a post has been truncated or not. (Modifying this feature is left as an exercise for the reader.)
Do you think it is a good exercise? So, how many of you have already solve this exercise? I've been browsing through pages of google results and found that currently, I didn't see anybody solve and publish the answer for this exercise with just the blogger layout code and without using other javascript code. I do the search because I'm a lazy coder where I don't wanna spend my precious time to reinvent the wheel. Anyway, after a few minutes of thinking, I got an idea on how to solve this problem. And as usual, I'm happy to share my solution with you.
Let's make it short now, here's the tutorial:
How can I create expandable post summaries that only show the "read more" link if post is truncated?
With this hack, you can choose to display a select amount of text from the beginning of each post as a teaser instead of showing the entire post on the front page of your blog. Then when people want to read the rest of the post, they can click a “read more” link to see the full post. This is very handy if you have lots of long articles all on one page. (Note that you’ll need to have post pages enabled in order to make this feature work.)
Step #1 - Edit your template code
To edit your template code, you have to go to your Layout > Edit HTML tab. Tick the Expand Widget Templates to have all the codes.

It is easier to copy all code and paste it to your text editor. To copy all code, click on the code area once and then press Ctrl+A to Select All. Press Ctrl+C to copy the selected codes, open your text editor and paste it in. Now you have your code ready to edit.
Add this code just before the
<b:skin> tag on your template code:
<style>
<b:if cond='data:blog.pageType == "item"'>
span.fullpost {display:inline;}
<b:else/>
span.fullpost {display:none;}
</b:if>
</style>
Here's how it should look. The yellow box in the image below shows your newly added code:

And then you have to find
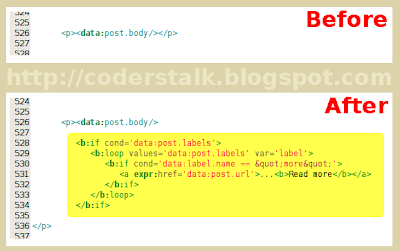
<data:post.body/> tag using Ctrl+F or find function in your text editor and paste this code just before the </p> tag, right after the <data:post.body/> tag:
<b:if cond='data:blog.pageType != "item"'>
<b:if cond='data:post.labels'>
<b:loop values='data:post.labels' var='label'>
<b:if cond='data:label.name == "more"'>
<a expr:href='data:post.url'>...<b>Read more</b></a>
</b:if>
</b:loop>
</b:if>
</b:if>
And the screenshot. The yellow box shows your newly added code:
 ------------------------------------------------------------------------------------------------
My Notes :
that image is the wrong example, to------------------------------------------------------------------------------------------------
make it fixed just follow the code before the image.
My solution here is by checking the label whether it have "more" label. So, in every post that you decided to have the "read more" link, you have to add this label. I'm adding a loop to read the labels for each post and inside the loop, there is an IF statement to check whether it have the "more" label.
You should notice this line with:
<b:if cond='data:label.name == "more"'>where the word 'more' in bold here is the label name. You can substitute this with any word you like but make sure you will only add that label to the post where you want to have the "read more" link.
And now, you can differentiate the truncated post.
'<' or '>' in your code.UPDATE!!: Please Read - Fixing Read More link appear on Blogger Fullpost
Step #2 - Add Class Tag in your default Post Template
The next step is optional to keep the class tag handy on every post you would like to have expandable post summaries. To add this, you can just go to Settings > Formatting tab on your blog settings. Scroll to the bottom and you will see the Post Template option. Then, put this code:
<span class="fullpost">

</span>
Here's the screenshot:

After that, click on Save Settings and you are done.
Step #3 - Creating your expandable post
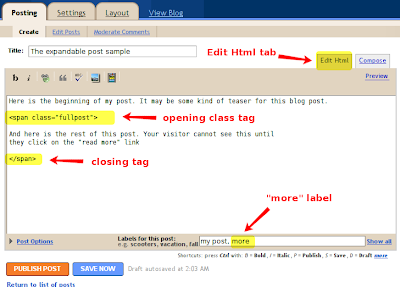
You can now follow the same way like in the blogger help to create your expandable post. When writing your new post, anything you put above the
<span class=”fullpost”> tag will be the teaser text. The main body of your post needs to go in between the <span class=”fullpost”> and </span> tags. When you have finish typing your post, make sure you add "more" label in order for the “read more” link to work properly.
Now, you can Publish your post, and see the result. Have fun blogging!!!
Read More......
Subscribe to:
Comments (Atom)